Monday, December 17, 2012

Charicature Portraits

As I mentioned in my previous post, I've recently taken on a variety of portrait work. The previous one was a HUGe  four foot by three foot imaginative family portrait done in oils with tons of details and more realistic features than caricature but by no means photo realistic. The One I want to show today leans much more in the direction of caricature but certainly not fully as I didn't go out of my way to exaggerate features other than the size of the head and some minor facial expressions and hair shape.
I took some video of me painting this image while discussing things as I go along. Unfortunately I probably won't have time to edit and post that until the new year. I began the image with drawings of the heads which I got approved by the client, then drew the bodies on separate paper and combined the two in photoshop playing with head size. then went into color samples and in particular for this image focused on how I was intending to paint the snow. 
 The drawing taped to a movable board that can be lifted and rotated if needed. The tape keeps the paper from buckling while also leaving us a clean white edge at the end. For this image I traced the final drawing to the watercolor paper with a light table but often I find that you can print the final onto final paper in a fraction of the time. The trouble of course is you have to use a thinner paper than may be desirable and even then will often have a hard time with the printer not being able to feed the paper correctly. For the printer method I find the heaviest paper that works is 140 lb and you have to make sure you have the grain of the paper feeding through the printer horizontally so that you can gently roll the paper prior to printing.
 Before painting the sky I masked out the foreground elements with winsor newton masking and used a supernib masking fluid for tiny details. Then I mixed a decent size batch of the sky color, pre-wet the paper with clean water using a spray bottle and  a large brush to go fast. I let the water dry for a bit then went in with a second coat just before applying large, fast,,horizontal strokes of paint which are more saturated at the top and less towards the horizon. For these large flakes I needed to work fast and get the salt into the paint before it dried to much. gently sprinkling salt onto the wet paint creates this great texture that looks unbelievably like falling snow flakes. For smaller flakes wait a bit more time before using the salt.
 Then let the sky dry. You can use a hairdryer to speed this up. Then peel off the masking fluid and apply some loose color ot the foreground. For a little texture int eh foreground snow I sprinkled some drops of water before the paint dries. Before peeling the masking off I generally use a wet brush and paper towel to get rid of any excess paint so that won't be smudged onto the clean white paper underneath.
 I build the faces up slowly with layers of paint. The precise method for this will depend on if you want hard edges shading on the face or softer. For hard edge, let each layers dry before applying another, for soft edge you'll need all your paint colors premixed so you can quickly lay one color into another int eh limited window you have. This takes much more practice to learnt eh exact time to lay int eh secondary and additional shading.
 generally for faces in watercolor I lay in all of the skin tones first and then hair building up in layers before finishing with the eyes, mouth, lips and such. This keeps darker paint from leaking into the skin tones.
 Unfortunately I was feeling the crunch of time so had to stop taking photo reference at this point. basically I continued to lay int eh facial features and hair in layers then painted the clothing and skis. Then for finishing touches Pulled out a bit of color around the skies to indicate misty snow, then used some gauche splattered on the paint legs to indicate small snow. Lastly I used  slightly wet brush to pull some of the colors off the figures behind them to indicate movement.The final scan is at the top of this post.

Thursday, December 13, 2012

Imaginative Family Portraits


The last few months have challenged me with a few opportunities to create portrait work. This is something I decided a couple months back that I would like to consider pursuing in a bit more depth. While portraits have never been my specialty and while I do struggle with them I think I found a couple of niches that work for me and give great results for the client and that I enjoy doing. One of those styles is the new style I'm calling "Imaginative Family Portraits". When I told a friend about this he asked me if I was painting an imaginary family for a guy who doesn't actually have a family.


What it actually is is to use various pictures of a family as photo reference and sort of collage them together if needed to get the best qualities from each photo. Then the really imaginative part is in the background or in how we chose to portray those figures. In doing this we end up with various photo references with various lighting situations so I basically have to imagine the light on their faces and often find other photo references to draw the folds on the clothing and such. It's a far cry from having the family sit in front of me to paint or just using one photo to copy meticulously. In the end it's not a traditional sort of portraiture at all but serves as an interesting conversation piece that hopefully at least captures their likenesses.  For this particular image we went through a number of ideas and decided on showing his family snuggled into a background displaying the various family vacations they had been on.
We also worked in various other interesting tid bits from the family personalities like colleges they attended, the restaurant the parents went on their first date at etc.
I would be interested in doing more of this sort of project for the right price. I've done four of these so far and each of them has fallen between 100-200 hrs. from start to finish! So they aren't cheap but could be just the thing for anyone looking for a memorable gift you can't get just anywhere. Feel free to contact me for a quote or inquiries, matthew.gauvin@gmail.com Another style of portraiture I've been experimenting is similar to caricature. I'll show some pics for that image in another post tomorrow.

Wednesday, October 17, 2012

Revised Illustrations


I can't remember the last time I was aggravated enough with an illustration to completely scrap it and repaint from scratch, but with my current book I did that for two illustrations. The first was this "mud pies" image. there were many problems with the first image (orange/warm image on the right) so I went back to the drawing board and was much happier with the bluer version on the left. Took out the parking meter, better lighter spot for the text in the sky rather than over dark mud, darker mud, better color scheme, clearer details and less muddy colors overall. 

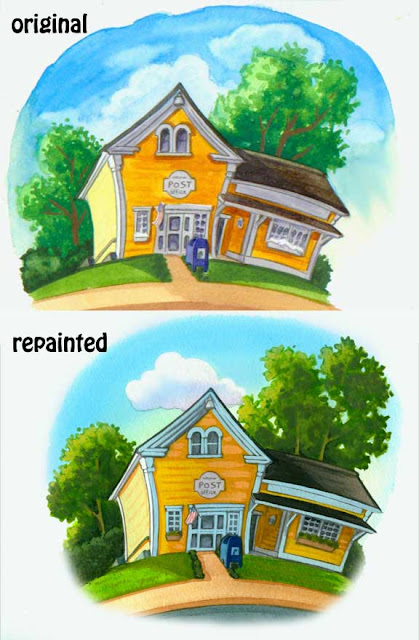
The next was this spot illustration of the post office. The client and I did like the first version but I'm pretty picky and saw lots of things that didn't come out as I had planned in my head. SO I tackled it again and like the new version much better. Mostly it was the trees, cloud and sky that made me want to repaint it but int the end I like all those as well as the new Po as well.

Wednesday, October 10, 2012

Family Portrait Drawing : Imaginative Portrait Illustration

One of the very first projects I ever worked on fresh out of college was a portrait commission for a friend of a friend. I was still soo new to the art world that I relied on a disposable camera to document my art, I hadn't yet purchased a darth vadar like mask to use with oil paints, my only projector had the words "tracer Jr." on the side in colorful bold type and my idea of good quality paper was basically a glorified newsprint paper.

    These of course were non essential to the task at hand, or so I thought).I jumped right into the portrait and felt I had done a decent job of it. I spent about five hours drawing the fellow and his wife from a small, grainy badly lit 5"x6" photo prvided. Then I had fun scribbling in the background with some dark charcoal making what I thought of as  a "cool" and "interesting" texture to fill the space.It was meant as an engagement gift for his wife. Then we agreed to meet at the local subway sandwich shop (where I worked at the time) to exchange payment for the final art. I actually remember making sandwiches when I saw him come in as my heart began to beat faster. At some point I found the time to run out back, grab the rolled up charcoal image and darted out to the table where he waited. I unrolled it real fast with my subway apron still tied around my waist, he nodded and said it looks good and handed me the cash. Probably the weirdest transaction in my whole career.

Of course now I do things extremely differently to the point of meticulously giving clients updates and asking for their advice, ideas and changes along the way so that I know they will be happy with the final product.  At the time of that portrait I didn't know much at all about portraiture and how difficult is really is to get a likeness of someone. When you think about the millions upon millions of people int eh world living and those who have passed on and how each face is different enough to be told apart from all the others. How is that even possible? and for the artist, how is it possible for us to represent each individual so precisely with mere pencil marks on two dimensional surface? Now seven years later I have only begun to scratch the surface of this dilemma as that was basically the last portrait commission I accepted from that point forward. The fellow came back and wanted adjustments which I did but it made me look at the portrait from a
more critical standpoint and realize I hadn't done a very good job at all. In the years that followed everything I learned about portrait art only served to enforce in me the realization that I don't have what it takes to be a portrait artist.

However something weird kept happening to me over the years of illustrating children's books
that I couldn't figure out how to escape. These independenat selp publishers were coming to me with book ideas and wanted me, time and time again, to use there own kids as reference for the main characters. I've done about twelve books to date and I would be hard pressed to point out the few where the clients didn't request that. So while I thought I left portraiture in the graphite powder (dust) I found that instead I was accepting gigs where I was now required to create entire character designs based off a few low res photos of kids who may or may not look the part. While this proved to be a time consuming and difficulttask it did help me learn how to study each subject critically and find the tiny details that make each kid unique. I also learned to draw various hair styles I probably would have been afraid to touch if I had just been designing my own characters.

     Now after years of drawing kids and adults alike and learning to create characters based on photos I have finally begun to learn the skills needed to consider portrait art with a new perspective and less trembling. Sometime a few years back I had a difficult time finding steady illustration work so I filled the time by doing some art competitions on the side. The image below is one such image. This was probably one of the first illustrations I had done that wasn't for a class assignment or for a client. Needless to say I had tons of fun with the image. I had no idea at the time that it would be the first of a series of illustrations I'm calling "Imaginative Portrait illustrations". This wasn't Even necessarily intended to be a self portrait but  did indeed use photos of myself as reference and the image is just as much about my own struggle with college loans as it is for any college student in debt.
I won second place for that contest and got a great piece of art that was shown in a couple of shows since then. But more importantly this image lead to more work! Soon after I was contacted to do a portrait illustration of a guy and his brother riding dinosaurs in outer space on a rainbow road. For some reason I accepted thinking " i can do that!"
Again I didn't see this image as a straight forward portrait and so convinced myself to accept the gig. The image as a whole had a lot to do with a very personal subject matter that one of the brothers was going through and so it tells a part of his life story. Again I thought, what an awesome piece! yet I still had no idea how I could get more projects like that. Until finally I was contacted by a client to do a portrait of his parents for their fiftieth wedding anniversary.
With this illustration things began to come a bit more into focus. I spent a couple hundred hours drawing the fifteen family members and the couple in various ages and various settings and working with the client to represent his parents lives on one canvas. It was a long and difficult task and one that sent me running back to the world of children's books with open arms for another couple of years, LOL. Yet I received lots of great feedback on the image and yet again found myself wanting more.

   Today I'm introducing a new portrait in this series for the same client as the one above. I'm still ironing out the details with the drawing and portrait portion but will be headed to paint soon! This one focuses on the portrait aspect far more than the others while still having a healthy does of additional background filler describing the lives of the family as a whole. As I work on the image I realize how much I love doing these and wonder if this isthe sort of thing other families or individuals might want. I'm considering offering this as a new service and possibly even start up a whole separate website geared towards these imaginative portrait illustrations. I'm thinking I would offer traditional graphite portraits at various price levels, traditional painted portraits and then at the high end would be the full blown imaginative portraits. These could practically be about just about anything the client can imagine them and their loved ones doing. riding unicorns through the clouds, submerged under the sea in scifi like underwater vehicles, or like the one below which has the family juxtaposed against a background of various family vacations and places of note in their lives. These would be for those who's families already have everything money can buy and who have a bare wall screaming for some sort art representing the family. I haven't worked out all of the details yet but I certainly expect at some point to try actively seeking out these sorts of projects. Now as I look back over the years I wonder what ever happened to that first protrait I did. Did the guy hang it on his wall or did he just buy a new gift for his wife and throw the image aside? Could he ever have possibly imagined that roughyl seven years later the young student who created that crude portrait would have made such large strides? What do the next seven years hodl ins tore for me as an artist? Time will tell. There is only one thing I know for sure whcihis that I will probably despise all fo the art I'm currently creating as I hope to have improved ten fold by then.

detailed view of the portraits.

Thursday, October 4, 2012

PIGS!!! Cover Design

I've been somewhat silent about my  "PIGS! , Under the Post Office?" book lately as the project underwent a change of plans and I took a bit of time off from it to work on other projects for a bit. We are now back on track with that book and still hoping to be published within a couple of months. All of the internal illustrations are done but I do have one more internal to repaint due to a lack of planning on my part with that image. It simply wasn't going to work to have text overlaid on it as it was and it came out terrible being the first image I painted in the book. I struggled a lot with how precisely to paint the mud for this book and didn't do as many preliminary color samples for that as I should have. Other than that I just have the cover design which we are working out final details for.


we will still play with background layout colors once the main design is chosen. This particular cover design is basically a combination of two of the internal illustrations so for the samples I just photo-shopped those two illustrations together rather than doing actual sloppy color samples. These could actually serve as the final cover designs but as I tend to get super picky with my art I will actually go ahead and paint out one final image. I have some changes that need to be made to specifically fit the images to the cover. The title is just a rough lay in for now and will be laid out by our graphic designer. As usual I plop in the cover with "Hobo STD" and hope the graphic designer comes up with better more pleasing ideas. As I always tell people, I'm not a graphic designer but doing this step does help the client to imagine the final design.

   I'm getting pretty excited about this book as I really like the story and feel the client has some new fresh ideas to promote and market the book. I also feel the book is somewhat timely as we are at a point in our country where post offices may be going extinct with the advance of e-mail, texting, and online communication in general.

Friday, September 28, 2012

Vermont Landscape Paintings : Oil and Watercolor

I'm very excited this morning to get to finally do a post displaying most of the landscapes I've been painting over the past few months for the East Burke Fall Folliage Festival. This hasn't been a full time venture by any means but it has certainly kept me busy in every spare moment I could get. I think the final total count for paintings is around thirty and then a ton of framed prints as well and postcards I made of some of my favorites (through Moo.com). I wanted to have a variety of things at different price levels to try reaching out to as many people as possible.  For those interested, the Festival is in East Burke,Vermont and will be this Saturday, Sept. 29th from 9 a.m.-4 p.m. I have no idea what to expect for sales as I've never done this before so I would suggest come early. Without further ado . . .


Tuesday, September 25, 2012

Dog Portrait, Characature, Landscapes etc.

These past few months have taken my art in unexpected directions as I venture into areas I hadn't given much consideration to previously.  I'm currently working on a new family portrait image which I don't yet have samples of. It's another one of my "imaginative Portraits" that I began doing a few years back. The difference with this one being that it focuses more heavily on the portrait aspect than the previous two images did.

    I also recently agreed to do a straight forward family portrait for a friend of my fiance. This came about as a result of him having seen the wedding invitations I illustrated for my upcoming wedding. I don't think I've ever done caricatures before either but for some reason this seemed like the natural thing to do for my wedding invitations. Not sure how that happened but they were tons of fun to illustrate and everyone is saying they love them!

I have also been putting a lot of work into making a portfolio of landscape paintings for the East Burke Fall Foliage Festival coming up on Sept. 29th in East Burke, VT. I've done landscapes in the past but never to the extent that I'm currently doing. I'm hoping to write a blog post this week displaying many of the images I painted for that. I'll have postcards and prints as well as the original art for sale.


Just today I finished painting a quick pet portrait I did as a reward for a kickstarter campaign for one of my books.


I've also been talking with a friend about doing a hand painted sign for his business. You might think that all of this is a result of not being able to find my typical children's book work. Actually I haven't really had an issue with that yet. I think it has more to do with just needing a bit of a break from those longer projects. All of these other avenues have been making me ask the question though. Should I in fact offer some of these other forms of art as a service? or should I stay focused in one area of art and try to perfect my skills therein? I don't know if it would make sense for me to have a children's book project going in one corner, pet portraits in one, landscapes in another and hand painted signs in yet another. In fact I know that would be a disaster and not good for my sanity as I currently have the messiest studio of all time and have nine folders for different clients on my desktop. I welcome any advice or comments from other artists who may have experience with these sorts of things in their own practice. I do have a feeling I'll keep doing some of these random projects on the side but will probably keep with the children's art as my main thing.


Friday, August 17, 2012

IF:Teacher

This weeks Illustration friday topic is "teacher". So I've decided to post two images from a different books. The first is from "The Little Boy Without a Name and Without A Birthday"

Teh next one is from a more recent chapter book I illustrated called "Samantha Loses the Box Turtle"

Tuesday, August 7, 2012

Taste The Rainbow!

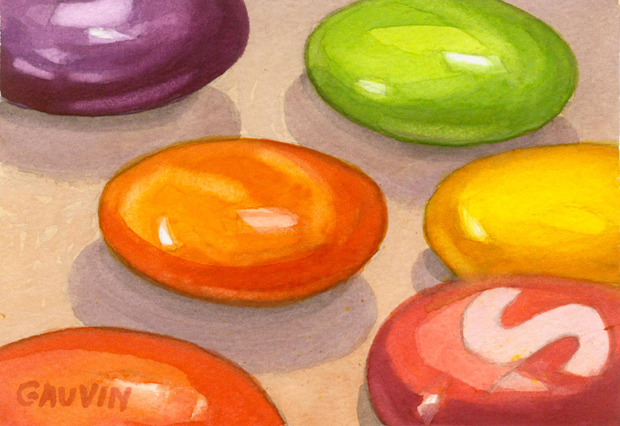
        This past week I was at the Laundromat keeping my fiancĂ© company when the vending machine called my name in no uncertain terms and with a very distinct glow, faintly trickling past my right eye. I vigorously walked in the direction of the faint hummm and was encountered by these bizarre colored disks in a red package with large white letters. They were small, strange, hard and shinny with a large white letter on each of the disks as well. I once saw E.T. Eat a substance similar to these on TV., back when I still wore those umpa loompa jammies with the zipper down the front and slippers sewn onto each leg. Yet those were very different than these. I knew these couldn't belong to him because the letter on them was an "S" and not an "E" or a "T" . Confounded I dumped some out onto the table in front of us and was only slightly surprised to see them roll around and form themselves into a crop circle sort of pattern before my very eyes. I ate one and then another. They kept making their way from the bag, to my stomach with such ease but not without a good deal of chewing along the way. That was my favorite segment of the journey as each bunch, when chewed, would release an assortment of fruity flavors upon contact with my tongue.


      I eventually realized the bag would soon disappear and no trace of the flattened spheres would remain as proof of my encounter. Of course saving some aside was out of the question as each subsequent sample called out in a distinct vocal pitch increasingly fine tuned to my inner longings for fruity substances. Thinking quickly on my feet . . . I got nothing. But then Barbie told me I should do a painting of them. And so after about fifteen minutes of moving the pieces around, looking through a viewfinder, I came up with the absolute best composition I could possibly muster under the circumstances. Then Barbie picked them all up and rolled them onto the table top, like a pro at a craps table in Vegas, and I painted them!

      So it is without further ado my dear blog readers, facebook friends, fans (well it sounded good), and family members that I present to you this 5"x6" watercolor rendering as proof of the alleged encounter with Martian space disks. Take it or leave it as you please. It is my contention that these colored disks are in fact sent from Mars in an attempt to search out and gather information from among the most astute and learned of all humans (clearly their navigation software is a bit glitchy) on the planet earth in an attempt to learn our strengths and weaknesses, so that the whole of Martian kind might stand some small chance against us in the ensuing war over their home planet. You've been warned!

Monday, August 6, 2012

Vermont Oil Landscape Paintings: 2

Back in April of 2011 I posted a bunch of oil landscape paintings I did over the past few years. I've since sold most of those paintings but haven't had time to make more until now. I've been working on tons of small watercolor landscapes and this past Saturday I painted the first oil landscape that I've done in over a year. I decided to document the process a bit.

posts of my watercolor landscapes. first few  , shows my pocharde box for plein air watercolor painting

This first image shows the final painting. Oil on 5"x6" wooden panel. I actually already painted this same scene twice in watercolor but have changed things with each image. the first one has  a house int he background with hay bails in the field on the right and the corn had just begun to grow. The second image put a differetn house int he image and has corn growing more but focusus more ont eh patern of the various fields. Then for this image I intended to focus primarily ont eh foreground corn. Unfortunately I ran low on time and ended up rushign the corm more than intended.

This next image shows the various items I bring with me when painting with oil in plein air. Some of these things are the same as used for my watercolor supplies. 1) fishing or picnic basket with hinge top. 2) orderless Mineral Spirits in a  pickle jar to clean the brushes. 3) oil paint tubes. I tied to limit my pallet to make color choices much faster and for an easier accomplished color harmony. Basically I have a warm and cool yellow, blue and red with white and a purple. 4) refined linseed oil for thinning the paint. 5) duct tape to hold things down. 6) a small folding canvas chair with a cold pouch built in under the seat. 7) This is a book I bring out into the field with me from time to time as I'm still learning how to get better and faster with my landscapes. "Oil Painter's Solution Book : Landscapes: Over 100 Answers to Your Oil Painting Questions" by Elizabeth Tolley. 8) A durable metal easel the adjusts up taller and shorter with tilting bar which accepts various size canvases. 9) A hand sewn brush pouch my sister made for me. It has various width slots to slide the brush handles into and has a flap that folds over the top of the brushes, then I roll it up to keep all of the bristles in shape during transport. In this pic I have folded the corners around the easel legs and clipped the corners of the brush pouch cloth in the back. 10) a mixture of OMS and linseed oil in a small glass jar with a  tight lid for thinning paints. As I build up the layers I use less OMS and more linseed oil for thicker layers of paint that will take slightly longer to dry. Doing the reverse may lead to cracking paint. 11) this is the same wooden box I use for my watercolors. It has a hinging lid and various compartments in the bottom half. 12) paint rag. 13) wooden panel with gessoed surface. 14) my wooden paint pallet that I've had since college.
below is a pic showing the painting in process. 1) is a tiny quick thumbnail value study to help me remember the original value structure as the light changes a lot over the course of a few hours. 2) I put some duct tape from the top lid of the box to the bottom lid to keep it at a 90 degree angle.  3) I have a small piece of duct tape holding the panel to the wooden box lid. The wooden box is clamped onto the easel between the two clips made for holding canvas. You can see my pallet in the foreground with dabs of paint laid out. I generally hold it in my left hand or rest it on my lap.

Below is a series of pics I took during the painting process. The first step involves laying in basic value structure . This is very thinned down paint and generally helps the next layers of paint go down much faster. Sometimes I do the under painting with a warm raw sienna or ochre as I've read about many times but this time I decided to try something I read in Tolley's book which shows her painting the background values with a cooler under painting and the foreground with warmer tones.  Doing this step also helps me to keep value in mind as I paint the various pieces of landscape. From reading Brad Teare's blog I learned a lot about keeping track of values from one mass to the next. Typically the sky will be the lightest value in the whole image, the ground or things on the horizontal plane facing the sky tend to be the next lightest while vertical things like trees and buildings have the darkest areas with the absolute darkest darks typically in the foreground. Typically i leave the sky white at this stage to allow more vibrancy to show through the sky. The darkest darks and highlights are saved for last

In this second image I have laid in the three or four main colors I mixed for the sky. I make a dark blue, light blue, a light yellow and light crimson. I start with dabs of each color, more blue and darker dabs towards the top and more of the warmer and lighter dabs towards the bottom of the sky. In step three I lightly blends the dabs of color together being sure to keep leave some of the colors showing rather than ruthlessly blend them. I learned this technique from a book by Wendon Blake called " The complete Painting Course" 
The sky colors blended with a soft bristle brush. I use a flat brush but they say a filbert is best. I've never found a filbert that doesn't leave marks. Guess I haven't spent a enough money on them.
I've laid in a purplish undertone for the ridgeline trees then put a light blueish green for the highlights and tried to vary the colors slightly and focused on having an interesting ridgeline. I later went back in and put sky holes in the trees. Sky holes is when you can see sky through the foliage of the trees. I first learned about this from my highschool art teacher Larry Golden and have since learned it from James gurney, Wendon Blake, Brad teare and others. When I was first learning to paint with acrylics I used to paint the whole sky first and paint the tree and leaves on top but this method of painting the sky holes on top of the foliage I find to leave much more pleasant results. I'll probably write a whole blog post about it at some point.
Now I worked in the middle ground trees and continue with the foreground field trying to keep variation of color amongst the trees and have them slightly darker than the background while the foreground field was in fact slightly lighter than the background field. The final image shows the corn painted in. ( the first image show in this post.).